Your first Hour with QuickBooks Online
Your First Hour with QuickBooks Online
Your first hour with any web-based application is probably spent exploring and clicking buttons, links, and other navigation tools to get the lay of the land.
Whether you’re just launching a business or you’re going online with an existing company, take some time to get acquainted with QuickBooks Online.
QuickBooks Online should be no different. In fact, it’s even more important to take it slow when you’re using an accounting solution. If you start entering data without understanding how everything works together, you may make mistakes early on that will be difficult to undo down the road.
Simple Setup
If you’re not absolutely certain you’re going to stick with QuickBooks Online, you can sign up for a 30-day free trial (no credit card required). You’ll first create an account by entering a user name, password, etc., then be asked a few simple questions about your business and the features you plan to use (invoicing, inventory, bills, etc.).
If you have data in a desktop QuickBooks file, you can start the import process here, but we strongly recommend that you let us help with setup if you’re planning to do this.

Once you start entering data, your QuickBooks Online Dashboard will give you an overview of your finances.
When you’ve completed your account setup, the main QuickBooks Online screen opens. You’ll see your Dashboard, a collection of data and charts that provides critical information like your bank balances, your outstanding invoices, and your current profit and loss.
You’ll eventually be using the vertical pane on the left for navigation. But you don’t need to click the links there yet – you have other setup tasks to do first.
Specifying Options
If you’ve used a desktop version of QuickBooks, you know about its many menus and its Preferences window. QuickBooks Online uses a different convention for choosing options and entering the information that will serve as the backbone for your company file. To get there, click the small gear icon in the upper right corner.
Tip: There are two other links next to the gear icon. You’ll be able to search for transactions by clicking the magnifying glass link. The plus (+) sign opens a window with links to screens where you can create transactions and initiate other activities.
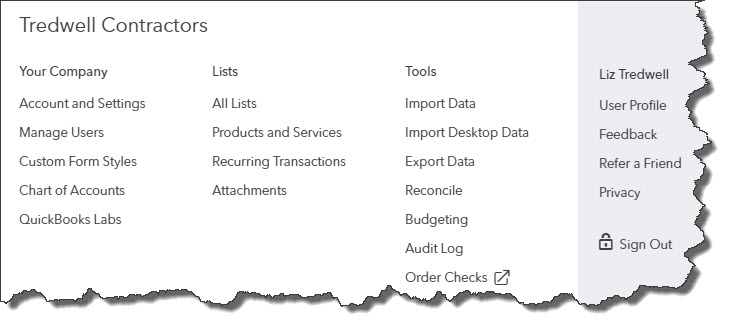
You’ll spend a lot of time working with the links in the Your Company window when you’re setting up QuickBooks Online. You can always refer back to it later on.
As you can see, you have access to a lot of data and activity in the Your Company window. You don’t have to go through absolutely every link before you start using QuickBooks Online, but two you should look at early are Account and Settings and Manage Users.
The Account and Settings page is divided into multiple areas that you can access from a navigation bar on the left. They include:
- Company. Fill in contact details and upload your company logo for use on sales forms.
- Sales. Customize sales form content (preferred terms, custom fields, discount field, etc.). Would you like to turn on inventory tracking?
- Expenses. Do you use purchase orders? Track expenses and items by customer? Make expenses and items billable?
- Payments. Do you want to subscribe to QuickBooks Payments so you can accept credit cards and/or bank payments through QuickBooks Online?
- Advanced. You’ll have numerous decisions to make here. For example, what tax form will you use? Will you want to automate some activities, like applying bill payments? Do you need to support multiple currencies?

The Advanced page of QuickBooks Online’s Account and Settings presents you with numerous options. You may want our help with this.
Multi-User Access
Will more than one person at your company be using QuickBooks Online? If so, you’ll most likely want to specify what areas they’re allowed to visit and what activities they can do. Click the gear icon in the upper right and then select Manage Users. QuickBooks Online displays a mini-interview in a window here that walks you through the process of assigning access rights to individuals (Custom User, Time Tracking Only, etc.).
We’ve probably taken up more than your first hour by now, but we wanted to stress the importance of thoroughly setting up QuickBooks Online before you start entering contact records and creating transactions. If this is your first experience with an accounting application, we highly recommend that you engage us in your first hours of using QuickBooks Online. We can come in at any time and troubleshoot problems, but it’ll be more economical and less time-consuming if we work with you from the start.