Can’t Keep Up with Bills? QuickBooks Online Can Help
There are more pleasant accounting tasks than paying bills, but QuickBooks Online organizes and simplifies this critical chore.
How does your company keep track of its bills now? If you’re like a lot of small businesses, you’re still dealing with a lot of paper. You may have a paper or electronic calendar where you enter all of the due dates as bills come in. When you see one approaching, you either take out your checkbook or schedule an online payment. Then you store all of your paid paper bills in file folders in case you have to look back at them.
It’s probably pretty clear to you that this isn’t the best system. You occasionally miss payments because a bill was lost in transit or for some other reason didn’t make its way to you. Or you were out of the office for a few days and didn’t look back on deadlines you missed.
QuickBooks Online can help keep bill-payment running smoothly and your relationships with vendors on the up-and-up.
Two-Step Process
Before you can start paying bills, you have to enter them into QuickBooks Online. This will entail a bit of extra work the first time you deal with a particular vendor, but there are numerous benefits to handling your accounts payable in this fashion, like:
- Speed. Once you’ve created a framework (template) for a bill, it will take minimal time to pay it in the future.
- Documentation. All of your bill payments will be recorded in QuickBooks Online, so you won’t have to hunt through checkbook registers or file folders to see if a bill was paid.
- Timeless. QuickBooks Online will always remind you when a bill must be paid (if you’ve set it up correctly).
To enter a bill, click the plus (+) sign at the top of the screen and click on Vendors and then Bill. This screen opens:
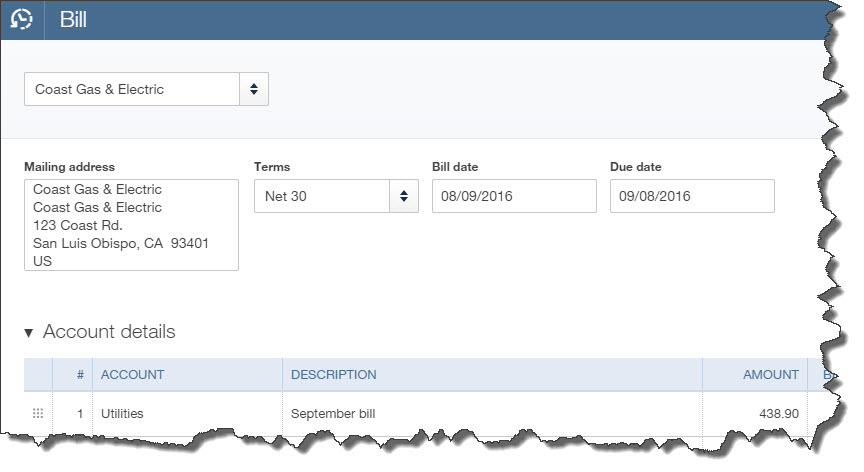
You’ll enter information about each bill on a screen like this. There are fields not pictured here that you’ll sometimes have to complete. So let’s start a conversation about the whole process.
Looks pretty simple, doesn’t it? It is – if you have a simple bill like the one you receive for gas and electric. You select the vendor by clicking on the arrow next to the blank field in the upper left and choosing from the list that opens. The Mailing Address and Terms should fill in automatically if you’ve done all of your initial QuickBooks Online setup. If not, you can add and edit this information.
Bill date refers to the date of the bill itself, not the day payment is due to the vendor. That goes in the Due date field. Select your Account from the list that opens when you click in that field, and enter a Description and Amount. If that’s all that’s required for that bill, you can save it and proceed to the next. It’s now recorded as a bill that needs to be paid.
Recurring Payments
Some of your bills are just one-offs,but others arrive on a regular basis. So QuickBooks Online has tools that will minimize the time required to process them after you’ve entered the basic information once. After you’ve completed a bill, click Make recurring at the bottom of the page to see this screen:
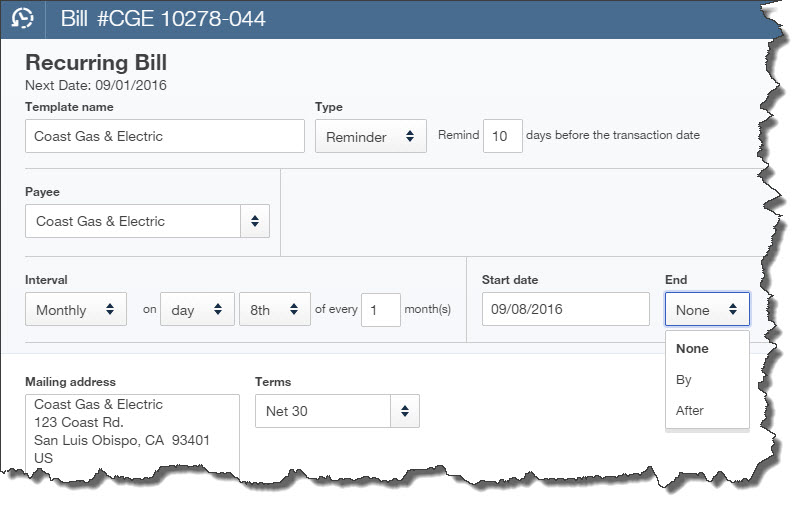
QuickBooks Online lets you create templates for bills to use in future payments.
This screen is self-explanatory. You simply tell QuickBooks Online how much notice you want before a bill’s due date so you can process the payment. Take care with this screen to avoid paying bills too early, which affects your cash flow unnecessarily, or too late.
You have three options when you’re creating a Recurring Bill template. You’ll choose one from the list that opens when you click the arrow in the Type field:
- Scheduled. This is best used when the details of a transaction don’t change, like rent or a loan payment. You don’t have to do anything for the payment to be dispatched; it’s done automatically for you at the interval you set. You can, however, ask to be notified every time this occurs.
- Reminder. You could use this for periodic payments that will require editing before they’re sent. For example, you’ll probably need to change the amount on your utility bills every month. QuickBooks Online will place a reminder in your Activities list on the home page.
- Unscheduled. If you have bills that contain a great deal of detail but aren’t due on a set schedule, you can save the template and call it up when you need it by clicking the gear icon in the upper right and selecting Recurring Transactions.
Next month, we’ll talk about the process of actually paying bills. If in the meantime you start entering bills and find that you’re having trouble completing the fields required for more complex bills, call us to schedule a session or two.