Tracking Products and Services in QuickBooks Online, Part 1
Inventory management requires precision, constant attention, and smart decisions. QuickBooks Online can help with tracking products and services.
If you started small with your business, keeping track of your product inventory was probably pretty easy. Maybe you kept your stock in a few boxes or a closet, and it was easy to tell at a glance what needed replenishing.
As you grew, the process of inventory-tracking started to get unwieldy. You were selling too many products in too large a volume; a casual look at your inventory no longer sufficed. And physical inventory counts took a lot of time. So you found yourself with too many of some items and not enough of others.
Keeping inventory items at financially-responsible levels is a delicate balance. If you have too much on hand, you tie up money. Too little in stock, and, well, you know what happens: you wind up with unfulfilled orders and unhappy customers. QuickBooks Online can help.
Building Inventory Records for Products and Services
QuickBooks Online’s inventory-management tools help you:
- Create thorough records for each product and service that you sell.
- Fill out sales and purchase forms — like invoices and purchase orders — quickly and accurately using these item records, and,
- Generate reports that provide the real-time status of your inventory.
You can build a database of product and service records using QuickBooks Online’s inventory management tools.
Here’s how to get started. Click on the gear icon in the upper right, next to your company name, and select Products and Services. Once you start adding records, this screen will display a table containing critical details about your inventory and non-inventory items as well as the services you sell.
Click New in the upper right corner. A vertical pane will slide out of the right side of the screen, asking you what type of item you want to describe. Select Inventory item, and the Product/Service information window opens. Enter the name of your item in the first field and its SKU (optional) in the next. You can upload an image if you’d like, too.
The line below this information reads Is sub-product or service. You should only click in the box in front of it if you have already created a parent product or service and want to put this item in a sub-category of it. In the example above, Writing tools is the parent category and 3 4×6 journals, multi-color is one member of that product category. (Questions? Ask us.)
As you can see, you can modify some options here without completely starting over. If this item should have been classified as a Non-inventory item, click Change type and select the correct one. You can also delete your image or replace it with another.
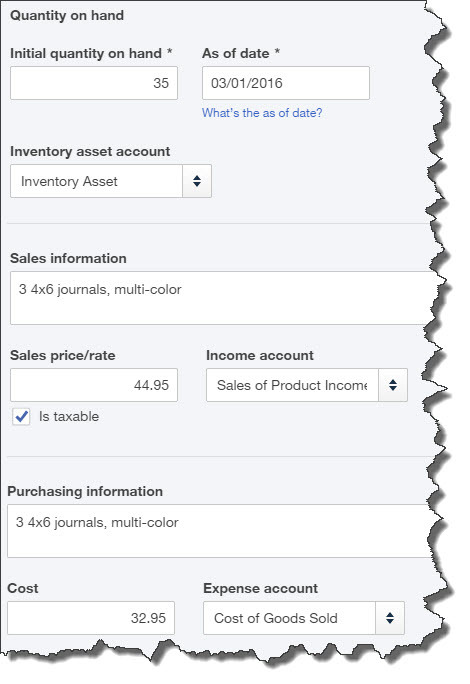
You need to be absolutely sure that your Initial quantity on hand figure is correct in this window, since it will affect transactions and reports.
How many units of this item do you have right now? Enter that number in the field and then choose today’s date from the calendar that’s available in the As of date field. Your Inventory asset account should be pre-selected to Inventory Asset. Account designations must always be correct in QuickBooks Online.
Warning: If you are unfamiliar with assigning items to accounts, let us walk you through the early stages of setting up your inventory records. We can help you understand the Chart of Accounts and how it relates to various tasks you’ll be doing.
Enter the description you would like to appear on sales forms in the Sales information field. Then complete the Sales price/rate box. This is the price that you will charge customers for the item. If sales tax will be applied, click in the box in front of Is taxable to create a check mark. Sales of Product Income will probably already appear in the Income account field.
Go through similar steps in the Purchasing information fields, keeping in mind that the Cost field should reflect your cost to buy the items you sell, if indeed you do purchase and resell inventory. When you’re done, click Save and close or Save and new.
This is a lot of work, but it’s important work. You’re building the foundation for your inventory management system.
Next month, we’ll look at how you will be using your item information in transactions and reports.